This blog describes how to test components indirectly without unnecessary disassembly. You’ll save time by testing components remotely via easily accessible areas such as the console of an appliance using what we call “shared electrical points” or SEPs. In this blog, we will highlight two main advantages of using SEPs: first, the ability to remotely test components from an appliance control panel, and second, the capacity to test components in a minimally invasive way that prevents disrupting their failure state and avoids false readings.
What is Indirect Component Testing?
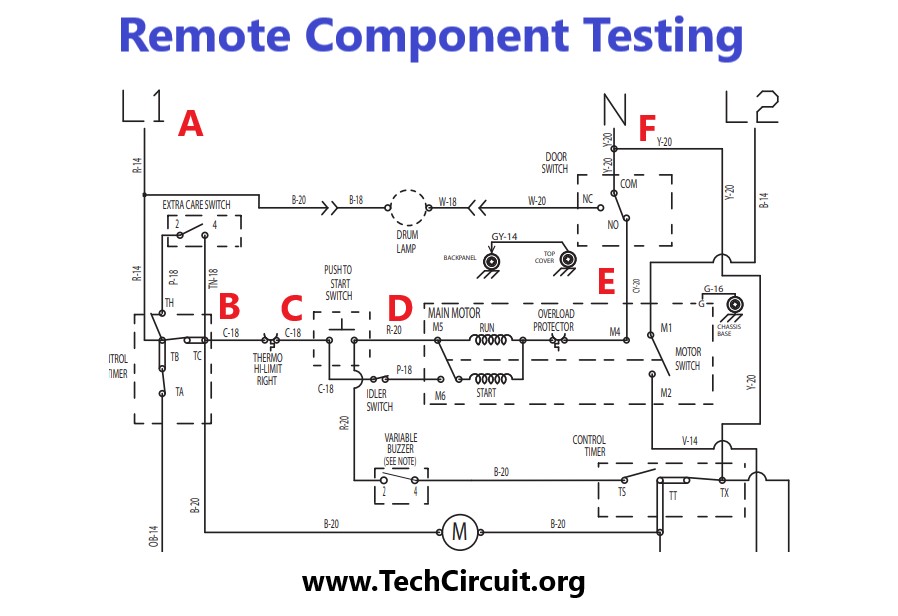
This method of testing components avails you of SEPs within a circuit. In the first illustrated example case, an electric dryer would not start. There was no noise and the motor was apparently not energized. Relevant components within the motor circuit will be remotely tested using the described method. The motor circuit starts from L1 and returns to Neutral. Along that path, in order of occurrence from L1, is:
- The timer
- Thermal high-limit
- Push-to-start switch
- The motor
- The door switch
Most of these components can be tested fully or to a substantial extent from the console.
Testing Procedure
Testing the Timer, Thermal High-limit, and the Push-to-start Button
Referring to the above schematic, the testing procedure can be performed as below. By setting your multimeter on “continuity”, you can start your test by unplugging the dryer and connecting one lead to the L1 spade on the plug (POINT A). You can then test whether the relevant timer contacts are closing by checking the “C” lug on the timer (POINT B). If you have continuity, L1 is making it that far. Since POINT B shares an electrical point with the thermal high-limit, you can determine whether it has continuity by checking the right side (POINT C). If you have continuity, the limit is also good. Now since that high-limit shares an electrical point with the “push-to-start” switch (POINT C), you can test its continuity by pushing it and testing the right side (POINT D) of it for continuity with your tied L1. If you have that, your start switch is also good. Although you could have easily checked its continuity alone, you may as well continue your momentum with this sequential (and really cool) circuit test.
Testing the Motor and Door Switch
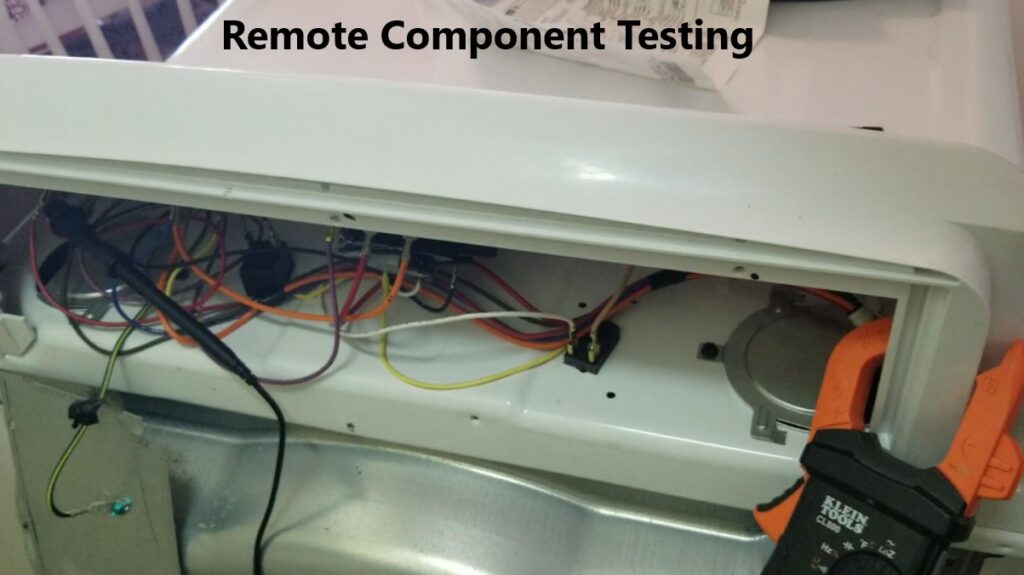
Two components remain in the circuit – the motor and the door switch. Both are embedded within the dryer but can be tested to a certain extent from the console. By disconnecting your reference lead from L1 and connecting it to Neutral (POINT F), you can proceed with this test. Testing the motor from this vantage point isn’t definitive, but you can still substantially achieve your goal. While referencing Neutral with one lead of your continuity meter, test the right side (POINT D) of the start switch. It shares an electrical point with the left side of the motor’s run winding. Through that winding, and on the other side of the motor, the door switch is connected (POINT E). If you have continuity, you know that both the door switch is closed, and the motor has continuity. If you open the door and no longer have continuity, you have confirmed your test. If however, you have no continuity, you’ll need to pull the door switch out and test the electrical point that is shared by that and the motor (POINT E). You’ll be able to tell which of the two components is open from there. The subject appliance is shown below:
Using SEP’s to Mitigate False Readings
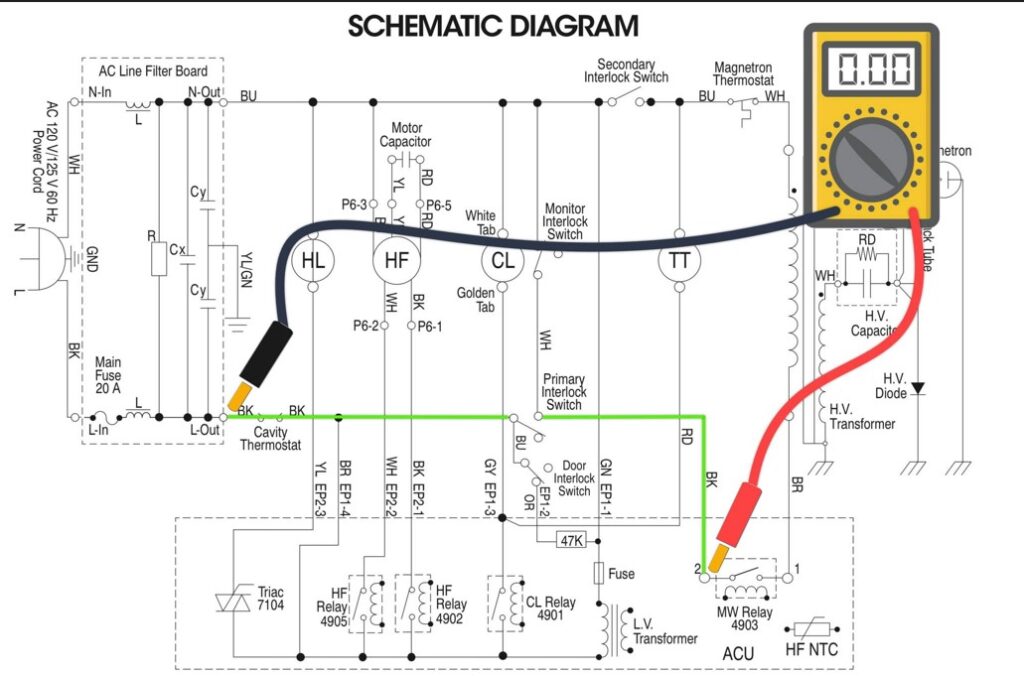
The second main advantage of SEPs is not to disturb the component of interest. The case example is with a microwave oven that would only count down during cook, but not energize the HV circuit nor engage the fan. The primary interlock switch was suspected. Such switches tend to have heat-stressed push-on connectors that are highly sensitive to any physical intervention. Such intervention can “re-connect” an otherwise loosely connected switch, and cause it to start working again. Testing the switch directly can result in a “false-negative” by leading the technician to believe it is making a solid connection and is properly switching. Using SEP’s mitigates this risk by physically distancing you from the component itself. In the image below, the primary interlock switch is tested from shared electrical points near the cavity thermostat and at the HV relay. Testing in this manner does not physically disturb the switch or its connections. Thus taking your reading from these points (whether it be a live voltage difference reading or static resistance check), greatly reduces the chance that you don’t inadvertently erase any clues during your diagnosis.
Summary
By using shared electrical points, you can remotely test circuits and relevant components – saving you disassembly time, while mitigating the risk of causing false-readings. In the first described case, the entire motor circuit from the console (less the instance where the motor or door switch is open) could be tested using this method. Using the schematic, simply identify the circuit that contains your subject load (in this case, the motor), and find which points along that circuit are accessible with minimal disassembly. At those points, identify which ones are shared with the individual components along that circuit path, and accordingly, test their continuity from your remote vantage point.
In the second described case, a suspected open microwave primary interlock switch is tested “from afar” for both convenience and so as not to cause the switch to start conducting again. This effort to avoid a false reading can help ensure you aren’t sent off on an unnecessary diagnostic tangent.
*FOR A RECOMMENDED MULITMETER – CLICK HERE*
To DONATE to the Tech Circuit – CLICK HERE
Alphabetical Links to all Tech Circuit Articles and Blogs – CLICK HERE
Links to all Tech Circuit Cheat Sheets/Field References for Appliance/HVAC Techs – CLICK HEREFor additional electrical and electronics learning material for field techs, visit our homepage at http://www.TechCircuit.org or our Facebook group at https://www.facebook.com/groups/746823709133603, or our YouTube Channel
at https://www.y